3D Printed K'nex Train
Introduction
Eager to break into the theme park and roller coaster engineering industry, I knew I needed a personal project to hone my skills and showcase my passion. The first idea that came to mind was revisiting my old K’Nex sets, a childhood favorite that always inspired my creativity. After discovering Knexmaker on Instagram and admiring their beautifully designed trains, I decided this would be the perfect starting project.
The goal of my project was twofold:
- Functionality and Accuracy: I aimed to design bogies (train undercarriages) that were functional and closely mirrored the designs used in the industry, at a beginner level.
- Improved Efficiency: The original K’Nex trains often lost kinetic energy due to friction in the wheels, limiting their potential. My objective was to reduce this friction, making the trains more dynamic and capable of navigating longer and more intricate layouts.
This project not only allowed me to improve my 3D modeling and problem-solving skills but also served as a stepping stone toward my ultimate goal of working in the industry I’ve always admired.
Concept Drawings
With the K’nex track gauge measured, I was ready to begin designing the trains. The first step was determining the diameter of the track—7mm—to calculate the necessary spacing for the upper and lower wheels. Additionally, I measured the distance required to position the outer wheels, which would keep the train securely on the track.
Armed with a ruler, my notepad, and a pencil, I started sketching out the wheel placements. These initial drawings laid out how the wheels would align and detailed the apparatus connecting them, including spacers, axles, and fasteners. These early concepts were critical for visualizing the project and ironing out the mechanics.
Unfortunately, I no longer have those original drawings. However, here is an example of a concept drawing I created for another project, following the same hands-on approach with ruler and pencil to bring the idea to life. In addition to the photo of the other project, here is a photo of the bogie fully printed with the ball bearings.
Bogie Dimensioning
Train Dimensioning
Bogie Axle Concept
With the bogie designed, the next challenge was creating an axle to connect both bogies to the track. My initial attempt at designing the axle is shown in the first image of this section, which features a 3-link system. The first link connected to one bogie, the second link connected to the chassis, and the third link connected to the other bogie.
While working on this design, I took the opportunity to reach out to professional engineers to gain insights into the industry, learn from their experiences, and seek valuable advice. One of these professionals, Charlie Wickham, provided invaluable guidance that helped me refine my approach.
This new axle design utilized a single link instead of three. This ensured the gauge between the bogies remained constant as they navigated the course. Additionally, the single link served as the yaw motion, one of the essential movements in roller coaster development. Beyond yaw, I successfully engineered independent pitch motions for each bogie. If both bogies were controlled by a single pitch motion, the system would not operate correctly. Each bogie was connected to the axle via a screw to allow for proper movement.
To ensure the axle’s reliability, I conducted a stress test to identify weak points. The results showed that the joints connecting the bogies to the axle needed reinforcement. To address this, I replaced the single extension connecting the bogies with a dual-extension system. This modification significantly strengthened the axle, enabling it to perform more effectively at higher speeds.
Initial Bogie Concept Design
Final Bogie Axle Design
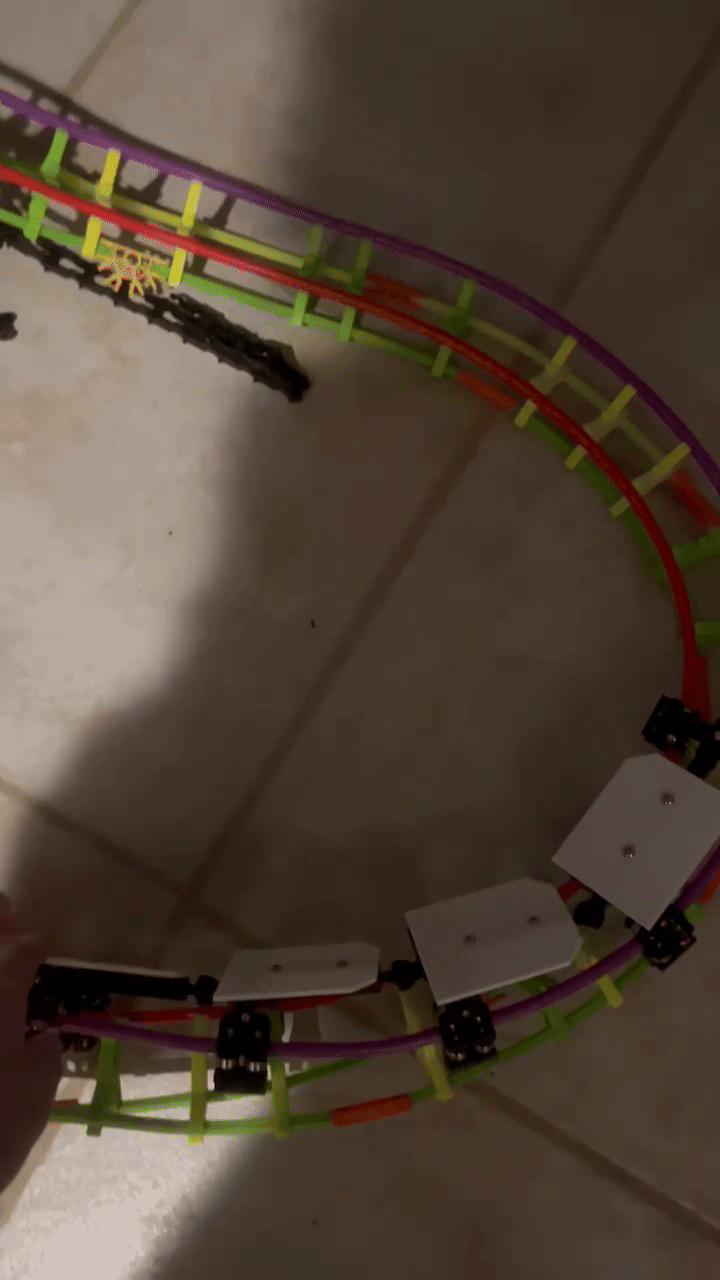
Chassis Development
The next step in my project was designing the chassis and undercarriage to hold each axle in a fixed position. To begin, I measured the length of the K’Nex trains and applied that length to determine the undercarriage dimensions. This ensured compatibility with the existing K’Nex system.
Once the undercarriage dimensions were set, I carefully modeled the axles to maintain a consistent height off the track. This step was crucial for ensuring the train remained perfectly horizontal as it moved. After assembling the pieces, I tested the design on a sample section of K’Nex track that I had constructed.
The results were flawless—the train moved smoothly and maintained its alignment. Satisfied with the performance, I moved on to the next phase of the project.
Expanded view of Undercarriage
Optimizing Efficiency
The next step in my project was designing the chassis and undercarriage to hold each axle in a fixed position. To begin, I measured the length of the K’nex trains and used those dimensions to determine the undercarriage length, ensuring compatibility with the existing system. I also modeled the axles to maintain a consistent height off the track, ensuring the train would remain perfectly horizontal during motion. After assembling the pieces, I tested the design on a sample section of K’Nex track I had constructed.
During testing, I noticed significant friction in the wheels, which slowed down the train’s motion. After some research, I discovered that grease in the ball bearings was causing this inefficiency. To resolve this, I carefully deshielded the ball bearings using an X-Acto knife (with caution) and placed the wheels in a bottle containing generic car degreaser. After thoroughly stirring the bearings in the degreaser, I transferred them to a water bath to remove any residue.
To prevent rust from forming on the metal due to contact with water and oxygen, I dried the bearings using a paper towel and my hairdryer to eliminate any remaining moisture. With the cleaning complete, I reattached the wheels to the bogies and tested the updated design on the track.
The results were outstanding! The wheels performed significantly better, far surpassing the original K’nex trains. If spun individually, the new wheels could spin for 20–25 seconds compared to just 3 seconds for the K’nex wheels. This achievement marked a major milestone in my project, as I had successfully reduced wheel friction and increased efficiency. I was ecstatic to see this crucial improvement in the development of my trains!
Bearings soaking in degreaser
Train Couplers
One of the final tasks in this project was designing a system to connect each train car together. Drawing inspiration from the K’Nex trains, I developed my own ball-and-joint system to integrate into the chassis. This system allowed for free movement of each individual train car, which is essential for navigating the intricate turns and potential inversions seen in roller coaster designs.
Once the ball-and-joint system was carefully modeled and 3D printed, I attached it to the chassis. The design provided the crucial three-dimensional motion required for smooth operation on dynamic tracks. With this final addition, the project was officially complete!
Train Couplers
Final Takeaways / Remarks
From start to finish, this project took about two months to complete, all while I was balancing a co-op and online classes. It was a challenging yet rewarding experience, and I was able to finish just in time for IAAPA, where I had the opportunity to showcase my work to engineers interested in learning more.
Throughout this project, I gained valuable insights into the directional motions of roller coaster bogies and learned how to complete finite element analysis to evaluate stress and performance. Additionally, my CAD skills were greatly enhanced as I worked through the design and prototyping stages. These takeaways have deepened my understanding of roller coaster engineering and helped me develop technical skills that will serve me well in the future.
If you’re a young engineer looking for a project to start with, I highly recommend taking on something similar. Don’t hesitate to reach out to professionals within the industry for guidance or advice—those connections were crucial to my progress. Without their support, I wouldn’t have been able to accomplish what I have so far.
I am incredibly proud to have this project as the first personal piece in my portfolio, and it has been an excellent foundation for my journey into engineering.